DFCD · Volume 6
OS & FreeCAD Setup
Raspberry Pi OS installation, FreeCAD configured for the DFCD screen and trackball, and performance notes
6.1 OS Selection
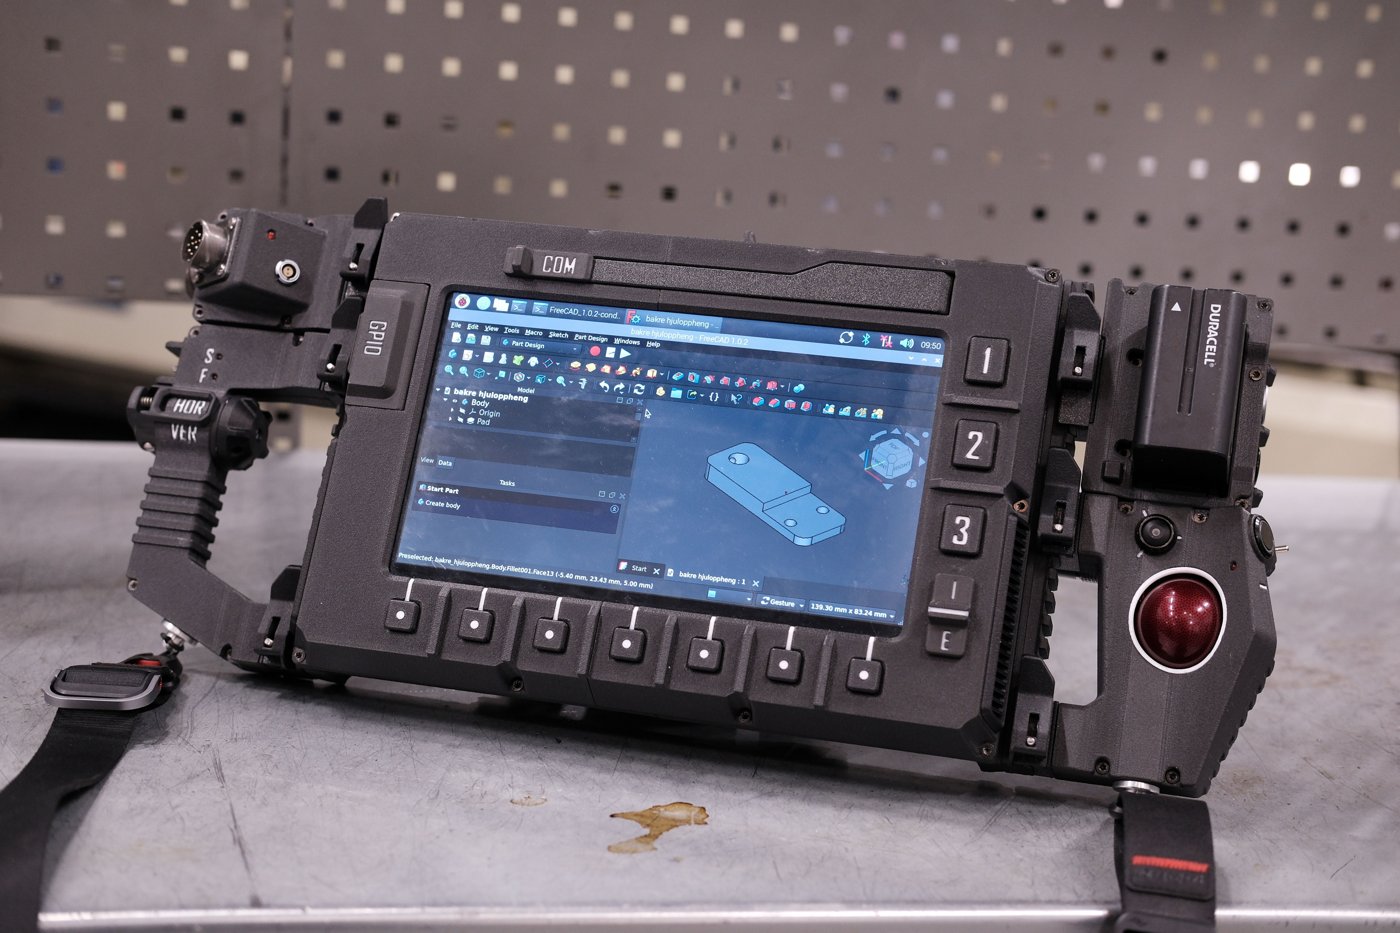
The DFCD’s primary use case — running FreeCAD — narrows the OS choice considerably. FreeCAD on ARM needs a mainstream Linux distribution with a maintained arm64 repository and a working OpenGL driver stack for the Pi 5’s VideoCore VII GPU. Raspberry Pi OS (64-bit) satisfies both and is the recommended starting point. This volume assumes Raspberry Pi OS Bookworm, current at the time this series was authored; a builder starting fresh should use whatever the current 64-bit release is (Bookworm’s successor, Trixie, had begun appearing as the default 64-bit image partway through 2026) — the guidance below applies to either, since the package and desktop-session details that matter for the DFCD haven’t changed between them.
Ubuntu Desktop (arm64) is a credible alternative for a builder who wants a rolling, less Pi-specific desktop and a newer FreeCAD build without waiting on Raspberry Pi OS’s own package cadence, at the cost of a heavier default desktop footprint and sometimes slower Pi-specific kernel/firmware patches. The option to avoid outright is 32-bit Raspberry Pi OS: FreeCAD’s arm64 builds require a 64-bit userland, and 32-bit Pi OS also caps per-process addressable memory in a way that erodes the 8 GB Pi 5’s headroom for large FreeCAD documents. Section 8 cross-references the PiFlux deep-dive’s OS volume for the fuller treatment of Pi 5 OS options; this volume stays narrowly focused on getting FreeCAD running well on the DFCD’s specific screen and input hardware.
6.2 Raspberry Pi OS Installation
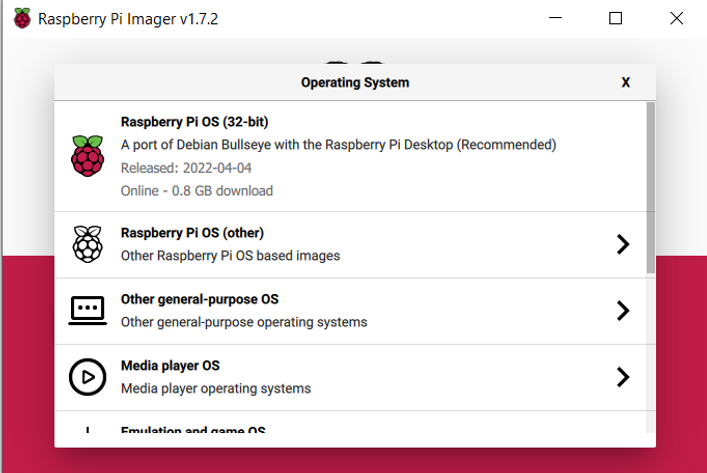
6.2.1 Imaging the microSD or NVMe
Raspberry Pi Imager is the standard tool for writing Raspberry Pi OS to the DFCD’s boot media — a microSD card, or for a builder who has added NVMe storage via a HAT+, an NVMe drive on a USB adapter for the initial write. Imager lists the Raspberry Pi 5 explicitly and surfaces “Raspberry Pi OS (64-bit)” as the flagship recommendation. Before writing, Imager’s gear-icon “advanced options” panel is worth using regardless of media: it can pre-set the hostname, enable SSH, configure Wi-Fi credentials, and set locale/keyboard layout directly into the image, letting the DFCD boot straight to a working, remotely reachable desktop rather than stopping at the interactive first-boot wizard (§2.2).
The upstream DFCD hardware list does not itemize an NVMe HAT+ or M.2 module, so the reference build is a microSD-only device; a builder who wants NVMe boot is adding that independently of the documented bill of materials. The Pi 5 supports booting from NVMe, but doing so requires an EEPROM firmware update and a change to the bootloader’s BOOT_ORDER so NVMe is tried ahead of the SD card — the exact procedure, including the BOOT_ORDER value and compatible M.2 form factors, is covered by the PiFlux deep-dive’s M.2 storage volume (../../PiFlux/02-inputs/volume_sources/vol3.md), which owns Pi 5 storage-expansion material for this hub. This volume does not duplicate that procedure.
6.2.2 First Boot and Initial Configuration
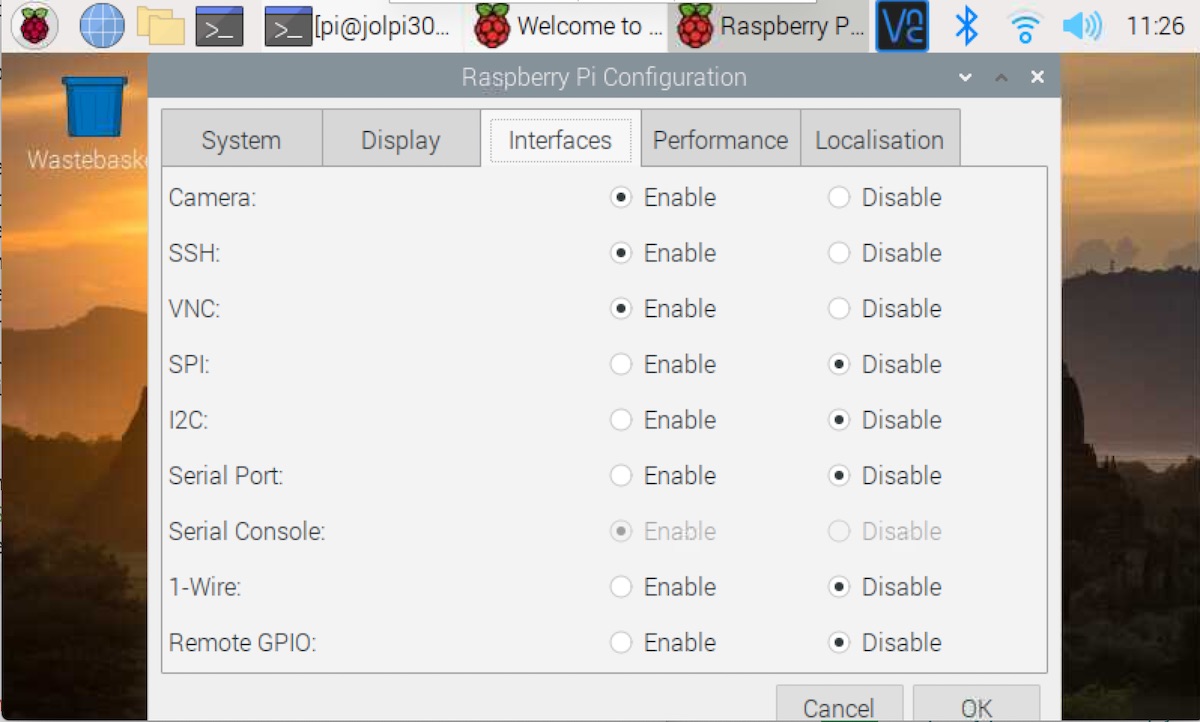
If Imager’s advanced options were not used, first boot lands on Raspberry Pi OS’s setup wizard: locale and timezone, Wi-Fi selection, and primary user account creation. Enabling SSH (raspi-config → Interface Options, or the Raspberry Pi Configuration GUI’s Interfaces tab) is worth doing immediately if the DFCD will ever be administered from another machine on the bench network, since remote access beats working directly on a 10.1-inch panel for anything beyond normal FreeCAD use.
Two housekeeping steps belong here before installing FreeCAD: a full package update (sudo apt update && sudo apt full-upgrade) to bring the base system and kernel current, and the Pi 5-specific firmware update (sudo rpi-eeprom-update -a, then reboot), which checks for a newer bootloader/EEPROM image and keeps the board’s low-level firmware aligned with the OS image rather than whatever revision shipped on the board.
6.2.3 Enabling the Touch Display
Whether the touch display needs explicit enabling depends on how its digitizer reports itself, and this is where Volume 2’s hedge on the exact panel matters directly. Volume 2 §2.1 establishes that the DFCD’s panel is very likely, though not confirmed against the specific listing, a capacitive touchscreen reported over its own USB cable as a driver-free HID multitouch device — the near-universal implementation for this panel class. If that holds, no device-tree overlay or kernel driver configuration is required: the panel enumerates as a standard USB HID input device the moment its USB cable is connected, exactly like the trackball and keyboard, and Raspberry Pi OS’s input stack (libinput, evdev underneath) picks it up without any config.txt changes.
The alternative is worth flagging rather than assuming away: some panels in this category use an I²C or SPI touch controller instead, which does require a device-tree overlay naming the specific chip and, in some cases, a matching kernel driver. Which case applies to the DFCD’s actual panel — and, if I²C/SPI, the exact overlay and controller name — is [VERIFY against the physical unit’s markings/datasheet or the upstream build video]; this volume will not invent a controller part number the upstream sources don’t confirm. Practically: connect the touch USB cable, check dmesg | tail or the Raspberry Pi Configuration GUI’s device list, and if a HID input device appears, no further configuration is needed.
6.3 Display Configuration
6.3.1 Resolution and Scaling
Volume 2 §2.1 flags the panel’s exact resolution as category-typical rather than confirmed: panels in this 10.1-inch IPS-with-HDMI class are built almost universally around a 1280×800 core. At that resolution and diagonal, pixel density works out to roughly 150 ppi — closer to a modest laptop panel than to a genuinely high-density display — so this is not the aggressive HiDPI case that forces large scaling factors just to keep text readable. A builder should still expect the default 100% scaling to render UI chrome (menu text, toolbar icons, window decorations) on the small side at typical bench distance; the Raspberry Pi Configuration tool’s Display tab exposes a scaling factor (100/125/150/200% are the common steps) worth setting to 125% as a starting point and adjusting by eye.
The detail that matters for FreeCAD specifically is that this OS-level scaling factor and FreeCAD’s own UI scaling are independent settings that do not automatically track each other (§6.1) — FreeCAD’s preferences still need checking separately once it’s installed, or its toolbar icons and panel text can end up mismatched relative to the rest of the desktop.
6.3.2 Rotation
Nothing in the sources reachable for this series pins down whether the reference build mounts its panel in landscape or portrait, so this remains [VERIFY against the upstream build video]. The circumstantial case favors landscape: the panel sits on a rail directly above a keyboard well sized to a 60%-class board’s width (Volume 3), reading naturally as a wide screen sliding over the keys — a portrait mount would leave the rail markedly narrower than the well beneath it.
If rotation is needed, the mechanism differs by desktop session. Raspberry Pi OS Bookworm and later default to a Wayland session (the labwc compositor), with X11 available as a fallback via raspi-config → Advanced Options → Wayland. Under X11, the classic display_rotate setting in config.txt rotates the framebuffer, and the touch digitizer’s axes then need remapping to match (historically xinput --map-to-output) or touch and video end up misaligned. Under the default labwc session, output rotation is configured through the compositor’s own output settings rather than config.txt; the exact mechanism for combining labwc rotation with a USB HID touch device is [VERIFY against the specific Raspberry Pi OS release in use] — the safest path is trying the display-orientation option already in the Raspberry Pi Configuration GUI first.
6.3.3 Display Auto-Suspend
The default screen-blanking behavior — the display going dark after a period of inactivity — works against the DFCD’s actual use pattern, where the device may sit untouched on the bench for several minutes between glances at a reference dimension. The simplest fix is the Raspberry Pi Configuration tool’s Display tab, which has a direct “Screen Blanking” toggle; disabling it is a one-click change that persists across reboots. The command-line equivalent, xset -dpms and xset s off (added to the desktop session’s autostart to persist), is X11-specific and has no effect under the default labwc session, where the GUI toggle is the more reliable path regardless of which session is active.
6.4 Input Device Setup
6.4.1 Trackball Configuration
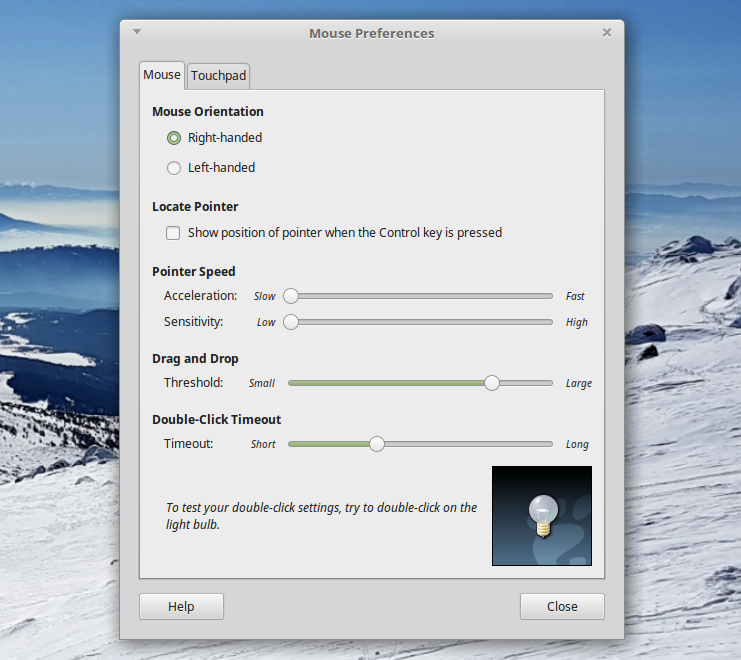
The harvested Logitech Marble electronics (Volume 2 §4.1) present to Linux as a standard USB HID pointing device, so Raspberry Pi OS needs no special driver — it appears alongside the touch panel and keyboard as soon as its USB leads are connected. What does need attention is pointer feel, since a trackball’s motion characteristics differ enough from a mouse’s that the OS default is rarely optimal. libinput — the input stack behind both the X11 and labwc sessions on current Raspberry Pi OS — offers an “adaptive” acceleration profile by default, scaling response with how fast the device is moved, versus a “flat” profile applying a constant multiplier for a predictable 1:1 relationship between hand and cursor motion. Because all of a trackball’s input comes from a fingertip or palm rolling a ball that never itself changes position — unlike a mouse, which the hand also translates across a surface — many trackball users find the flat profile’s constant response easier to predict, and it’s worth setting as the DFCD’s default and tuning the speed multiplier by feel. The Mouse settings in the Raspberry Pi Configuration GUI expose a basic speed slider; explicitly selecting the flat profile is available via libinput/xinput configuration on X11, though the equivalent knob’s location under the default labwc session is [VERIFY against the specific Raspberry Pi OS release in use].
Scroll behavior depends on which Marble revision was harvested and whether its scroll mechanism survived the harvest with wiring intact — a detail Volume 2 §4.1 already flags as unconfirmed. If scroll isn’t available from the trackball itself, FreeCAD’s Touchpad navigation mode (§6.2) mitigates this, since it maps zoom to a modifier-plus-drag gesture as well as to a wheel.
6.4.2 Keyboard Layout and Mapping
The keyboard is the NOS C-450 Mini Pro — a 60%-class, 62-key mechanical board on Outemu Red switches (Volume 2 §3.1 works through the naming discrepancy with the upstream hardware list’s “NOS 450 TKL” label; it is 60%-class, not true tenkeyless). Electrically it’s a standard USB HID keyboard requiring no driver; locale-specific mapping goes through raspi-config’s Localisation Options or, more conveniently, Imager’s advanced options before first boot (§2.2).
The layout distinction matters more than a naming footnote once FreeCAD is in daily use. A true TKL board keeps a dedicated function row and arrow-key cluster; a 60%-class board drops both, accessing them through a secondary Fn-layer instead. FreeCAD’s default shortcut set leans on function keys for several common actions (F2 for rename) and on arrow keys for incremental view/selection movement in some workbenches — still reachable on the NOS C-450 Mini Pro, but only through its Fn-combination layer. A builder moving from a larger keyboard should expect a short adjustment period learning which Fn-combinations map to which FreeCAD shortcuts.
6.4.3 Touch Input
Assuming the driver-free USB HID case from §2.3 holds, touch coordinate calibration is largely a non-issue: HID multitouch digitizers report normalized absolute coordinates the input stack maps across the full display automatically, unlike older resistive panels that needed a separate calibration utility. Palm rejection — distinguishing an intentional touch from an incidental brush of the palm while reaching past the screen to the keyboard beneath it — is handled, to whatever degree it is handled at all, by firmware inside the touch controller rather than anything configurable in the Linux input stack; how well a given panel does this is panel-dependent and worth testing empirically. Using touch and the trackball concurrently needs no special configuration: each shows up as its own independent input device, and basic pointing and clicking work side by side without arbitration.
6.5 FreeCAD Installation
6.5.1 Package Repository vs. AppImage vs. Snap
FreeCAD on Raspberry Pi OS arm64 is available through several channels, trading currency of version against installation convenience. The apt package (sudo apt install freecad) is the simplest path but tends to lag noticeably behind FreeCAD’s own release cadence — builders have reported apt still serving FreeCAD 1.0 well after 1.1 was current upstream. The AppImage — a self-contained Linux-aarch64 build from freecad.org’s release page — tracks upstream releases most closely and is the method most consistently confirmed working on Pi 3/4/5 under 64-bit Raspberry Pi OS across multiple independent guides; it requires the FUSE userspace library (not installed by default on every image) and the file marked executable. A Flatpak build (org.freecad.FreeCAD via Flathub) also tracks recent releases, at the cost of a larger disk footprint (budget roughly 4 GB) and a separate update workflow. A Snap package exists too, in the Snap Store’s Raspbian/arm listing, though it turned up less consistently recommended in the sources checked here.
For the DFCD, the AppImage is the recommended default — the version gap on apt is real enough to matter for a device whose whole point is running a current, capable FreeCAD. A builder who wants a graphical installer wrapping the same AppImage can use the community Pi-Apps installer (Engineering category), which installs and updates it through a GUI.
6.5.2 Installation Steps
The apt path is a single command pair: sudo apt update && sudo apt install freecad, then checking the installed version (freecad --version or Help → About) against the current release on freecad.org to judge how far it has lagged.
For the AppImage path: download the release tagged Linux-aarch64 from FreeCAD’s downloads page, make it executable (chmod +x FreeCAD*.AppImage, or the equivalent file-manager Permissions toggle), and ensure the FUSE library needed to mount AppImages is present — commonly packaged as libfuse2 on Debian-derived systems, though the exact package name has shifted between Raspberry Pi OS releases and is worth confirming with apt search fuse if the AppImage refuses to launch. Once executable, it runs directly (./FreeCAD*.AppImage); a builder who wants it in the applications menu can add a .desktop launcher, or use Pi-Apps, which handles that automatically.
6.5.3 First Launch Verification
Before proceeding to §6, verify the install with a simple smoke test: open one of the STEP files from the upstream DFCD repository itself (the chassis or a modular component makes a natural, appropriately-sized test file). Confirm it opens without error, the viewport renders correctly, and basic navigation responds. This confirms the GPU driver path works end-to-end before any preference changes are layered on top, making it easier to isolate whether a later problem is a tuning mistake or an installation issue.
6.6 FreeCAD Tuning for the DFCD
6.6.1 UI Scaling and Font Size
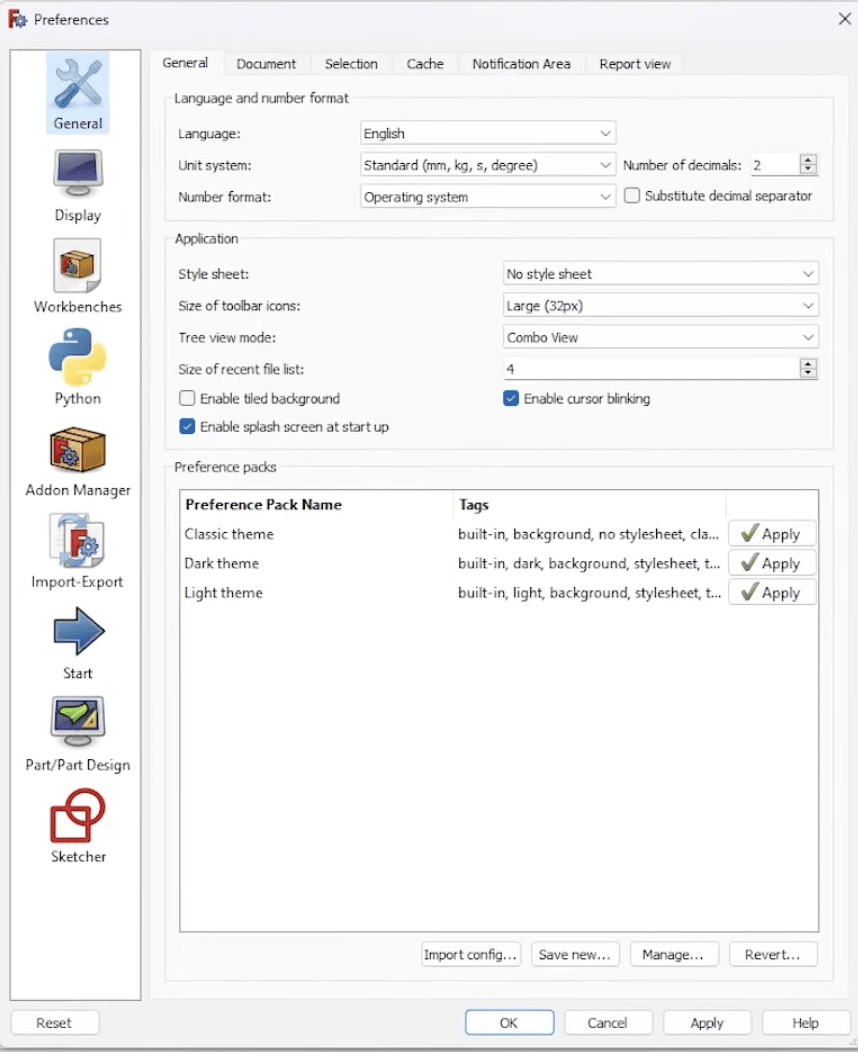
FreeCAD is a Qt application, and Qt’s own high-DPI scaling respects the OS-level scaling factor set in §3.1 to a degree — but FreeCAD’s preferences add a second, independent layer on top, covering toolbar icon size and 3D-view marker/point size (the latter also relevant to performance, §6.3). The two mechanisms don’t automatically reconcile: set the OS-level scale factor first, then open FreeCAD’s Preferences (Edit → Preferences) and check the Display tabs for icon and marker sizing, adjusting by eye against the OS scale already in effect. FreeCAD’s HiDPI behavior on Linux has historically had rough edges — inconsistent cursor sizing and mismatches on mixed-DPI setups are documented complaints in its own developer discussions — so expect to iterate by eye on the DFCD’s specific panel rather than treat one setting as fire-and-forget.
6.6.2 Navigation Mode
FreeCAD ships several 3D-viewport navigation styles, selectable through Edit → Preferences → Display → Navigation → 3D Navigation, or the right-click context menu in the 3D view. The default, CAD Navigation, expects middle-mouse-button chording for orbit — hold the middle button, then add the left button to rotate — which assumes a mouse with a reliable, comfortably-clickable middle button. A harvested trackball is exactly the case this assumption breaks down for: many trackball units make chorded middle-click awkward or don’t expose a middle button at all, since a rolling ball under the fingers doesn’t naturally support pressing a center button the way a mouse’s palm rest does.
FreeCAD’s own documentation and user community identify this as a known friction point and describe the Touchpad navigation style as the built-in accommodation: panning is SHIFT plus movement, zooming is the wheel or CTRL+SHIFT plus movement, and rotation is ALT plus movement (or SHIFT plus a left-button drag) — none of it dependent on a middle button. This is the recommended style for the DFCD’s trackball, worth setting as the default before any other FreeCAD tuning, since navigation ergonomics color every other usability judgment made afterward. The Blender style is a reasonable alternative for a builder whose particular Marble revision does retain a working middle-click, but Touchpad is the safer default given the uncertainty already flagged around the trackball’s exact button complement (Volume 2 §4.1).
The rotary encoder and button column beside the trackball (Volume 2 §7.1, wired in Volume 4) are a plausible future extension here — an encoder is a natural fit for supplemental zoom or scroll control once its output reaches the OS as ordinary input events — but the upstream project hasn’t published how that wiring is meant to present to software, so this volume assigns it no specific FreeCAD binding. Volume 7 tracks this alongside the DFCD’s other open integration questions.
6.6.3 Performance-Related Settings
A handful of FreeCAD preferences trade visual fidelity for viewport responsiveness, and naming them specifically matters more than a generic “turn settings down” instruction. Anti-aliasing (Preferences → Display → 3D View) offers a None option alongside line-smoothing and multi-sample modes; dropping to the lightest mode reduces per-frame GPU work directly and is the first setting worth touching if orbiting a moderately complex model feels sluggish. Marker size, in the same preferences area, controls how large FreeCAD draws vertex and point markers — larger markers are easier to tap accurately on the touchscreen but cost more to render on sketches with many points, a legibility/performance tradeoff worth setting deliberately. FreeCAD has no game-engine-style level-of-detail system, but its document-level tessellation (mesh deviation) setting — how finely curved surfaces are faceted for display — serves a similar role: raising the deviation tolerance trades visibly coarser facets for less geometry to redraw each frame, a reasonable trade for a reference device that isn’t producing publication-quality renders.
Underneath all of this sits the Pi 5’s GPU driver stack. FreeCAD’s 3D view is built on Coin3D (Open Inventor), which targets desktop-profile OpenGL; the Pi 5’s Mesa-based V3D driver for the VideoCore VII provides OpenGL ES natively along with a desktop-OpenGL compatibility path, and multiple independent reports confirm FreeCAD installs and renders correctly on Pi 5 hardware today — the GL profile negotiation happens transparently. The VideoCore VII’s Vulkan 1.3 capability, noted elsewhere in this series (Volume 1, Volume 2) as a platform feature, is not currently exploited by FreeCAD: Coin3D’s pipeline is OpenGL-based as of this writing, and a modern rendering-abstraction effort is funded and in-progress (FreeCAD Grant Program, 2025) — with BGFX, which supports Vulkan among other backends, named as the leading candidate implementation, though Vulkan itself is not the committed target — rather than a shipped capability. All of FreeCAD’s rendering on the DFCD runs the OpenGL path regardless of the GPU’s Vulkan support.
6.6.4 File Association
Configuring the file manager to open STEP, IGES, and FreeCAD’s native .FCStd files directly on double-click is a small but real convenience for workshop use, where reaching for a reference file quickly matters more than at a desk. The mechanism is xdg-mime, associating each MIME type with a .desktop launcher (xdg-mime default <launcher>.desktop model/step, and equivalently for IGES/FCStd). What differs is how that launcher gets created: an apt-installed FreeCAD typically registers its own .desktop file and MIME associations automatically, while a bare AppImage does not register itself with the desktop environment unless run through a helper like AppImageLauncher, or a .desktop file pointing at the AppImage’s path is created and associated by hand. A builder who chose the AppImage path in §5.1 should expect this one extra manual step that apt would have handled automatically.
6.7 Performance Notes
No controlled benchmark of FreeCAD on the DFCD’s specific hardware exists yet — the project’s status as of this writing is research-and-authoring, with the physical unit not yet built (see the project’s CLAUDE.md) — so these notes are drawn from community reports of FreeCAD on Pi 5 generally, and should be read as directional rather than certified. Field write-ups of FreeCAD 1.1 on a Pi 5 describe the 8 GB RAM tier as the sensible minimum for real work (consistent with the DFCD’s own BOM choice, Volume 2 §1.1) and note that a mild CPU overclock provides useful headroom, though neither source publishes a rigorous benchmark methodology, so specific frame-rate or face-count thresholds are [VERIFY from bench testing once the DFCD is built].
Qualitatively, the more confident claim is architectural rather than numeric: the Pi 5’s quad-core Cortex-A76, while a genuine step up from the Pi 4, is still a mobile-class part next to a modern desktop CPU in single-thread throughput and memory bandwidth — and FreeCAD’s geometry kernel (OpenCascade) does most of its heavy lifting single-threaded, whether solving a sketch’s constraints, computing a fillet, or recomputing a boolean across a parametric history. Viewport navigation of an already-computed, moderate-complexity model is comparatively cheap — mostly GPU-bound rasterization of resolved geometry — and is where the Pi 5 feels genuinely usable. Recomputing a heavily parametric model, or an operation touching a large tessellated mesh, is where the CPU-bound gap shows up most: fast enough to open, inspect, measure, and lightly edit; not fast enough to feel like a workstation for sustained, feature-heavy sessions.
Practical advice follows directly from that boundary: suppress or hide parts of an assembly not relevant to the current task, since every visible body is geometry the viewport redraws every frame; work within the Sketch or Part Design workbench focused on the specific body rather than loading a whole multi-body assembly; use section views to reduce visible geometry when inspecting an internal feature; and close documents not actively in use, since FreeCAD keeps every open document resident in memory and an 8 GB board shares that budget with the OS, desktop session, and anything else running alongside it (a browser tab, a PDF viewer).
6.8 Cross-Reference: PiFlux Multiboot Volume
The PiFlux deep-dive at ../../PiFlux/ owns Raspberry Pi 5 platform material for this hub, and several of its volumes go deeper than this one on subjects DFCD builders will eventually run into. Its OS volume (../../PiFlux/02-inputs/volume_sources/vol7.md) covers all of the Pi 5’s viable operating-system choices — Ubuntu, the Debian-based security distributions Kali and Parrot, and dedicated-purpose images like Batocera — along with multiboot strategies from simply swapping SD cards, to PINN or BerryBoot on a single card, to splitting a primary OS onto NVMe with an alternate kept on SD. A DFCD builder who wants a FreeCAD-dedicated OS alongside a general-purpose one, or who wants to weigh Ubuntu Desktop arm64 against Raspberry Pi OS for package freshness (§1), should start there.
The PiFlux’s M.2 storage volume (../../PiFlux/02-inputs/volume_sources/vol3.md) is the correct reference for the NVMe boot procedure mentioned in §2.1 — the EEPROM update, the BOOT_ORDER change, and M.2 form-factor compatibility — for any DFCD builder adding NVMe beyond the reference build’s microSD-only bill of materials. Its Pi 5 selection volume (../../PiFlux/02-inputs/volume_sources/vol2.md) is the reference for the RAM-tier tradeoffs touched on in §1 and §7. Readers who want the full Raspberry Pi 5 platform story, independent of either chassis, should begin with the PiFlux series overview.
Comments (0)